Monday, June 6, 2016

"Green Bloomers" (Green Circle Tangle)

"Green Bloomers" (Green Circle Tangle) by Megan O'Madadhain
My Green Circle Tangle (nicknamed "Green Bloomers") is part of my "Rainbow Circle Tangle" series. For this series I started by tracing a circle and then used circles to define the regions.

The good:

I like the tree extending to the edge of the page. It reminds me of stained glass. I also like the texture behind that tree. I did a wash of pale green (using "indirect blending") with swabs of more intense color on top. This was inspired by some artwork I saw on Pinterest.
The trees remind me of stained glass.
I like the way that the scales in the lower left are colored. Usually my instinct is to do a slow color blend for each scale pattern, but I like the way the coloring jumps from light green to a dark green outline, to a medium green.


While not very novel, I like the vines and the way they extend past the edges of the original circle. The lines in the background remind me of wood block carvings.


Using Perspective in Tangle Drawings

There are many, many great online resources for learning how to draw objects in perspective so that they look 3-D. I think it's really helpful to know even a little bit about perspective drawing. It can be fun to have parts of your tangle that seem to fade into the distance or seem to be drawn on folds of fabric, for example. If you just want quick results, find a few tangles that look convincing and try to do something similar. Look for which lines in the grid are parallel to each other and which are converging to a point.

Most of the resources for drawing in perspective are way too complicated for a beginner and do not give practical help for someone quickly wanting to apply those techniques into a tangle. My skills with creating perspective drawings is rudimentary, but I decided to create an example that would help new tanglers a place to start.

Grid Pattern Fading Into the Distance

Below is a simple grid pattern that looks like a game of Tic-Tac-Toe. I chose to make the horizontal lines blue and the vertical lines red to make it easier to see how each type of line changes in subsequent examples. Many tangle patterns are based on grid patterns, so these basic steps can be used for a variety of different patterns.
Simple tic-tac-toe grid pattern.
Each "O" shape touches the grid square halfway on each side. Similarly, each X shape touches the corners of each grid square that it is in. No matter how the grid is distorted BOTH OF THOSE MUST STILL BE TRUE.


Tangle-Related Activities

I have found creating tangles to be really fun, but following a set pattern of rules for art isn't my style. Some of the people who create videos on YouTube of themselves tangling claim to spend hours daily creating tangles or doing associated activities (like creating videos). Since January I have spent a few hours a week on average in total in activities related to tangling, depending on the amount of free time I have and my mood (how geeky, artsy, relaxed, stressed, organized, or creative I am feeling). Some of these activities include:

  • Creating new tangles (by myself or with my kids)
    A pile of original tangle art.

  • Trying out different color combinations (possibly in a coloring book such as Creative Coloring: Patterns of Nature)
    Experimenting with colors in a coloring book can be helpful.

  • Practicing general drawing (for example, filling a page of a sketchbook with different drawings of leaves, flowers, etc.)
    Part of a sketchbook page of different flower doodles.

  • Practicing perspective drawing of patterns (see Using Perspective with Tangle Patterns)
    Practicing "Gottago" pattern as given, and with added perspective.
  • Practicing tangle patterns (for example, starting with an established geometric pattern and trying multiple variations -- see Drawing Tangle Patterns)
  • Several variations of the "Cadent" pattern.
  • Looking for new tangle patterns (see Finding and Organizing Tangle Patterns)

  • Learning how to modify tangle in graphic programs such as GIMP (so that I can cut out the outline of the tangle and put it on t-shirts or other items in my CafePress store).

  • Researching different art supplies and tangle books

  • Creating a CafePress store and Zazzle store

  • Working on this blog!

Both the more geeky and more artsy parts of that list had steep learning curves for me. I have probably spent more than half of my time wrestling with GIMP, CafePress, Zazzle, and Blogger rather than actually creating art. After I feel like I have covered the basics with my blog, I am hoping to spend the majority of my available time creating new art rather than on other tangle-related activities. This is a good project for a "artistic generalist and geek-in-denial," as it says in my profile.

How I Create Tangles

See How to Draw a Tangle for a short version of how to draw a tangle by various methods. This post is specific to how I tend to create tangles (see also Tangle Art Supplies for more details about the materials I use and why). Warning: mild humor.

My actual process for creating a tangle goes something like this:

  • Get a white art tile (4" by 4" or 6" by 6")

  • Draw or trace some kind of border in pencil (I often roughly draw a square or use a stencil to trace a circle).

  • Use a pencil to divide the area inside the border into sections by some method.

  • Look through various tangle pattern sources for an interesting pattern that I want to try (I often start with a geometric pattern that is tricky for me) and fill in one or more sections with that pattern using a black pen (usually 0.5 mm size). If the pattern is difficult for me I will lightly trace at least the basic outline of the pattern in pencil first.

  • Possibly fill in one or more sections with a light marker color or color gradient that I want to use as the background or base color for a tangle pattern (because "waterproof" black pens cannot be entirely trusted not to bleed).

  • Fill in the other sections with different patterns -- probably easier ones. If I get somewhat stuck on what pattern to use I try rotating the tangle to see if any new ideas occur to me. If I am still stuck I look at additional tangle pattern sources (see "Finding and Organizing Tangle Patterns" blog post). I sleep on it if necessary. I try to have some balance of darker and lighter sections and some variety of patterns (perhaps one based on a square grid, one with lots of curves, one based on circles, etc.). I may decide to change where the section boundaries are if convenient, and possibly have some part of the tangle extend beyond the original border.

  • Add colors to some sections (I try to find combinations of about 3 colors that work well together) directly with markers or by blending colors on a plastic sheet and using a colorless blender pen to transfer the color to the tangle (see "Coloring Tangles" blog post).

  • Frantically try to edit parts of the tangle that are annoying me (the results of which may inspire swearing and occasionally cause me to ditch the tangle). Many sections may contain a lot more black after these edits. Sometimes additional marks may be added to make previous "mistakes" look intentional.

  • Possibly attempt to add a little bit of white as an accent on top of another color using a white pen and discover once again that I have instead created grey mush. Get really frustrated, wait until the ink is ACTUALLY dry, and then try again. Adding white on top makes the tangle look somewhat "flat" and odd in that spot, so I try to avoid it as much as possible. Adding black on top of the white looks even worse, so be careful with adding white.

  • Sign the art somewhere, and write my name and the date on the back. If I colored the tangle, I may also indicate what colors I used on the back for future reference.
I predict that my methods will evolve somewhat over time -- at the very least now that I've written this blog post I am more likely to wait until my art dries before trying to use a white gel pen on it. :-)

Sunday, June 5, 2016

How to Draw a Tangle

Tangles

A "tangle" in general terms is used to describe art that is contains sections of repeating patterns.

Steps to create a tangle:
  • Create art that has some patterns in it
Congratulations! You've created a tangle!

There are many sources for tangle patterns if you need inspiration. If you need more structure, start with a large shape (such as a circle, outline of an elephant, big blob, etc.), divide the shape into sections, and fill each section with some type of pattern.

Step 1: Outline a shape.
Step 2: Divide the shape into sections.
Step 3: Fill one of the sections with a pattern.
Step 4: Fill remaining sections with patterns.

It is a good idea to write your name and the date on the back of your tangle. You can also add a signature or your initials to the front (anywhere in or around the tangle!).

Zentangle Method

The creators of the Zentangle® method define a tangle as an "abstract, patterned drawing created according to the tenets of the Zentangle Method." I think of the Zentangle Method as a combination of mindfulness and art creation with a specific sequence with many restrictions thrown in (no coloring, small size, draw in pen) to help focus on process rather than result (see www.Zentangle.com). Based on the the marketing I have seen, I assume that the creators of the Zentangle method make money through book sales, certification courses, supplies, and classes.

If you would like a detailed description of the Zentangle method with accompanying pictures, you could buy a book such as Joy of Zentangle or look online at WikiHow.

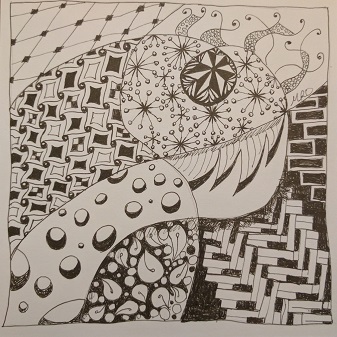
For my first two tangles, I largely followed the basic Zentangle steps (except that I used 6" by 6" paper tiles instead of 3.5" by 3.5" paper tiles and skipped the first step ("Get Focused" ).

My first tangle.
My second tangle.

Additional Resources

Of course the way each person approaches creating tangles varies. For the curious, here is How I Create a Tangle. Perfect for beginning tanglers who want useful tips but feel intimidated by YouTube videos created by people who do tangle drawings for hours every day.

For those who need inspiration for tangle patterns, try Finding and Organizing Tangle Patterns.

For those who want to try adding a little bit of perspective drawing to their tangles without spending time on a lot of theory, try Using Perspective in Tangle Drawings.