Monday, June 6, 2016

"Green Bloomers" (Green Circle Tangle)

"Green Bloomers" (Green Circle Tangle) by Megan O'Madadhain
My Green Circle Tangle (nicknamed "Green Bloomers") is part of my "Rainbow Circle Tangle" series. For this series I started by tracing a circle and then used circles to define the regions.

The good:

I like the tree extending to the edge of the page. It reminds me of stained glass. I also like the texture behind that tree. I did a wash of pale green (using "indirect blending") with swabs of more intense color on top. This was inspired by some artwork I saw on Pinterest.
The trees remind me of stained glass.
I like the way that the scales in the lower left are colored. Usually my instinct is to do a slow color blend for each scale pattern, but I like the way the coloring jumps from light green to a dark green outline, to a medium green.


While not very novel, I like the vines and the way they extend past the edges of the original circle. The lines in the background remind me of wood block carvings.


Using Perspective in Tangle Drawings

There are many, many great online resources for learning how to draw objects in perspective so that they look 3-D. I think it's really helpful to know even a little bit about perspective drawing. It can be fun to have parts of your tangle that seem to fade into the distance or seem to be drawn on folds of fabric, for example. If you just want quick results, find a few tangles that look convincing and try to do something similar. Look for which lines in the grid are parallel to each other and which are converging to a point.

Most of the resources for drawing in perspective are way too complicated for a beginner and do not give practical help for someone quickly wanting to apply those techniques into a tangle. My skills with creating perspective drawings is rudimentary, but I decided to create an example that would help new tanglers a place to start.

Grid Pattern Fading Into the Distance

Below is a simple grid pattern that looks like a game of Tic-Tac-Toe. I chose to make the horizontal lines blue and the vertical lines red to make it easier to see how each type of line changes in subsequent examples. Many tangle patterns are based on grid patterns, so these basic steps can be used for a variety of different patterns.
Simple tic-tac-toe grid pattern.
Each "O" shape touches the grid square halfway on each side. Similarly, each X shape touches the corners of each grid square that it is in. No matter how the grid is distorted BOTH OF THOSE MUST STILL BE TRUE.


Tangle-Related Activities

I have found creating tangles to be really fun, but following a set pattern of rules for art isn't my style. Some of the people who create videos on YouTube of themselves tangling claim to spend hours daily creating tangles or doing associated activities (like creating videos). Since January I have spent a few hours a week on average in total in activities related to tangling, depending on the amount of free time I have and my mood (how geeky, artsy, relaxed, stressed, organized, or creative I am feeling). Some of these activities include:

  • Creating new tangles (by myself or with my kids)
    A pile of original tangle art.

  • Trying out different color combinations (possibly in a coloring book such as Creative Coloring: Patterns of Nature)
    Experimenting with colors in a coloring book can be helpful.

  • Practicing general drawing (for example, filling a page of a sketchbook with different drawings of leaves, flowers, etc.)
    Part of a sketchbook page of different flower doodles.

  • Practicing perspective drawing of patterns (see Using Perspective with Tangle Patterns)
    Practicing "Gottago" pattern as given, and with added perspective.
  • Practicing tangle patterns (for example, starting with an established geometric pattern and trying multiple variations -- see Drawing Tangle Patterns)
  • Several variations of the "Cadent" pattern.
  • Looking for new tangle patterns (see Finding and Organizing Tangle Patterns)

  • Learning how to modify tangle in graphic programs such as GIMP (so that I can cut out the outline of the tangle and put it on t-shirts or other items in my CafePress store).

  • Researching different art supplies and tangle books

  • Creating a CafePress store and Zazzle store

  • Working on this blog!

Both the more geeky and more artsy parts of that list had steep learning curves for me. I have probably spent more than half of my time wrestling with GIMP, CafePress, Zazzle, and Blogger rather than actually creating art. After I feel like I have covered the basics with my blog, I am hoping to spend the majority of my available time creating new art rather than on other tangle-related activities. This is a good project for a "artistic generalist and geek-in-denial," as it says in my profile.

How I Create Tangles

See How to Draw a Tangle for a short version of how to draw a tangle by various methods. This post is specific to how I tend to create tangles (see also Tangle Art Supplies for more details about the materials I use and why). Warning: mild humor.

My actual process for creating a tangle goes something like this:

  • Get a white art tile (4" by 4" or 6" by 6")

  • Draw or trace some kind of border in pencil (I often roughly draw a square or use a stencil to trace a circle).

  • Use a pencil to divide the area inside the border into sections by some method.

  • Look through various tangle pattern sources for an interesting pattern that I want to try (I often start with a geometric pattern that is tricky for me) and fill in one or more sections with that pattern using a black pen (usually 0.5 mm size). If the pattern is difficult for me I will lightly trace at least the basic outline of the pattern in pencil first.

  • Possibly fill in one or more sections with a light marker color or color gradient that I want to use as the background or base color for a tangle pattern (because "waterproof" black pens cannot be entirely trusted not to bleed).

  • Fill in the other sections with different patterns -- probably easier ones. If I get somewhat stuck on what pattern to use I try rotating the tangle to see if any new ideas occur to me. If I am still stuck I look at additional tangle pattern sources (see "Finding and Organizing Tangle Patterns" blog post). I sleep on it if necessary. I try to have some balance of darker and lighter sections and some variety of patterns (perhaps one based on a square grid, one with lots of curves, one based on circles, etc.). I may decide to change where the section boundaries are if convenient, and possibly have some part of the tangle extend beyond the original border.

  • Add colors to some sections (I try to find combinations of about 3 colors that work well together) directly with markers or by blending colors on a plastic sheet and using a colorless blender pen to transfer the color to the tangle (see "Coloring Tangles" blog post).

  • Frantically try to edit parts of the tangle that are annoying me (the results of which may inspire swearing and occasionally cause me to ditch the tangle). Many sections may contain a lot more black after these edits. Sometimes additional marks may be added to make previous "mistakes" look intentional.

  • Possibly attempt to add a little bit of white as an accent on top of another color using a white pen and discover once again that I have instead created grey mush. Get really frustrated, wait until the ink is ACTUALLY dry, and then try again. Adding white on top makes the tangle look somewhat "flat" and odd in that spot, so I try to avoid it as much as possible. Adding black on top of the white looks even worse, so be careful with adding white.

  • Sign the art somewhere, and write my name and the date on the back. If I colored the tangle, I may also indicate what colors I used on the back for future reference.
I predict that my methods will evolve somewhat over time -- at the very least now that I've written this blog post I am more likely to wait until my art dries before trying to use a white gel pen on it. :-)

Sunday, June 5, 2016

How to Draw a Tangle

Tangles

A "tangle" in general terms is used to describe art that is contains sections of repeating patterns.

Steps to create a tangle:
  • Create art that has some patterns in it
Congratulations! You've created a tangle!

There are many sources for tangle patterns if you need inspiration. If you need more structure, start with a large shape (such as a circle, outline of an elephant, big blob, etc.), divide the shape into sections, and fill each section with some type of pattern.

Step 1: Outline a shape.
Step 2: Divide the shape into sections.
Step 3: Fill one of the sections with a pattern.
Step 4: Fill remaining sections with patterns.

It is a good idea to write your name and the date on the back of your tangle. You can also add a signature or your initials to the front (anywhere in or around the tangle!).

Zentangle Method

The creators of the Zentangle® method define a tangle as an "abstract, patterned drawing created according to the tenets of the Zentangle Method." I think of the Zentangle Method as a combination of mindfulness and art creation with a specific sequence with many restrictions thrown in (no coloring, small size, draw in pen) to help focus on process rather than result (see www.Zentangle.com). Based on the the marketing I have seen, I assume that the creators of the Zentangle method make money through book sales, certification courses, supplies, and classes.

If you would like a detailed description of the Zentangle method with accompanying pictures, you could buy a book such as Joy of Zentangle or look online at WikiHow.

For my first two tangles, I largely followed the basic Zentangle steps (except that I used 6" by 6" paper tiles instead of 3.5" by 3.5" paper tiles and skipped the first step ("Get Focused" ).

My first tangle.
My second tangle.

Additional Resources

Of course the way each person approaches creating tangles varies. For the curious, here is How I Create a Tangle. Perfect for beginning tanglers who want useful tips but feel intimidated by YouTube videos created by people who do tangle drawings for hours every day.

For those who need inspiration for tangle patterns, try Finding and Organizing Tangle Patterns.

For those who want to try adding a little bit of perspective drawing to their tangles without spending time on a lot of theory, try Using Perspective in Tangle Drawings.

Saturday, May 28, 2016

"Sparky" (Yellow Circle Tangle)


"Sparky" (Yellow Circle Tangle) by Megan O'Madadhain

My Yellow Circle Tangle (nicknamed "Sparky") is part of my "Rainbow Circle Tangle" series. For this series I started by tracing a circle and then used circles to define the regions. I limited myself to 3-4 colors and only used shades of one main color.


The good:

I find the pattern at the top exciting. As far as I know it is a new pattern. Basically restricting myself to a circle meant that I instantly wanted to find ways to escape it, and my "Circlecut" pattern was one way to achieve that.
My "Circlecut" pattern.
Once I added the floral pattern that looks like eyes, this tangle became an "it" to me, so I added the feet and went with it.
Adding a variant of the "Wabi" pattern made the tangle appear to have eyes.
 To me it looks like a steampunk mechanical sidekick. Something about this one makes me happy.

The bad:

I would not have added the area full of triangles if I had intended to create a mechanical creature from the start. I also would have bent the patterns on the circle so that they seemed to be on a sphere rather than a flat object. Color-wise, this is more monochromatic than I wanted; yellow is tough -- add even a tiny bit of red and it looks orange, add even a tiny bit of blue and it looks green.  I will probably do another version of this one at some point, probably with more color variation.


Art in context:

The "Rainbow Circle Tangle" series is one of my earliest attempts to do colored tangles.


The nitty gritty:

The large floral pattern is a variant of the "Wabi" pattern. The pattern of triangles is a "Kathy's Dilemma" pattern variation. Coming out of the top of "Sparky" is my "Circlecut" pattern.
My "Circlecut" pattern
I used Tombow Dual Brush Markers and a Micron black pen, typically size "05" (0.5mm). Original is 4" x 4" ink on paper.

Sunday, May 22, 2016

Tangle Art Supplies

I first became of the Zentangle /Tangle movement while visiting a local craft store. Adult coloring books and Zentangle books are big business right now and there was a large area of the store devoted to books and supplies. I connected instantly with this style of art and thought it would be a great idea to have some form of art that I could do that didn't take up much time or space, especially since I knew that I would be less active for a few months. However, I did buy some supplies that I was unhappy with later, so for those who want a little more guidance...

Tangle Art Supply Recommendations (Short Version):

  • Black pen: Prismacolor black fine-line markers -- These are more waterproof than Micron or Sharpie pens, which is important if you like to color tangles with water-based markers. They are acid-free. I generally use size 05 (0.5mm) most of the time, with size 03 (0.3mm) for finer detail and size B (brush tip) to fill in large black areas.
  • Paper: Strathmore Artist Tiles -- I like white 4" by 4" tiles. Larger sizes take a really long time to fill up unless you do simple and/or very large patterns. A 6" by 6" tile works well with kids, in my experience, especially if you are using wider tip markers. You can also buy these in tan and black.
  • Colored Pens for adults: Tombow Dual Brush Markers if you want a lot of colors and want to experiment with color blending. Copic markers seem to be good also if blending isn't as important (I only tried them out in the store) and have the benefit of being reasonably waterproof. Sharpie permanent markers are a good option if you want a good variety of inexpensive pens.
  • Colored Pens for kids: Use "washable" markers if you must, but regular Crayola pens have much richer color. Try to get more colors than they typically get in school or add different color options. If you can trust your kid with Sharpie permanent markers, those are a good low-cost option with a good variety of colors. If your kids draw tangles in black and then color them, I recommend getting a good waterproof marker (such as a size 1 (1mm) Prismacolor black fine-line marker) to draw the patterns so that their markers won't smear the lines.
  • Pencil, pencil sharpener, eraser (Zentangle purists say not to have an eraser available -- whatever)
  • some kind of blending stub if you want to shade your tangle using pencil
  • access to some collection of tangle patterns is helpful
  • small (around 4" to 6") ruler to help plan difficult tangle patterns
  • helpful stencils. I like starting many tangles in circles (typically 3") and sometimes separate tangles by using circle stencils in some way. Letter stencils can also be helpful.

Art Supply Investigations (Long Version)

Initial Supplies

As a start I purchased two drawing books: Joy of Zentangle and Time to Tangle with Color available at my local craft store. The official Zentangle kits didn't have many pieces of paper in them and the paper looked too small to me (3" square), so instead I opted to buy some of the items separately. The books specifically recommended black Pigma Micron pens in different widths, so I bought size 01 (0.1mm), 03 (0.3mm) and 1 (1mm) to give me some options to try. These pens have the advantage of being acid free (which means they shouldn't fade over time or attack the paper they are on) and are "waterproof" (more on that later). Near the Zentangle supplies they were selling white Strathmore Artist Tiles which are also acid free, so I bought two sizes: 4" by 4" and 6" by 6". I didn't see the recommended colored pens in the store (Tombow Dual Brush Markers), so I initially skipped that. I bought a white Gelly Roll pen so I could retroactively add white over other colors or experiment with using white marker on black or tan backgrounds.

Best Black Pen

Get the best waterproof, acid-free black pen to do the tangle patterns, especially if you like to use markers (or watercolors) to color your tangles. Discovering that your "waterproof" black pen line smears as soon as you start adding color is not fun. I have not found a black pen that is 100% waterproof when you color over it with a color pen, but Prismacolor black fine-line markers are the best I've found. Definitely better than Sharpies, Micron pens, or Copic Markers. I generally use:
  • size 05 (0.5mm) for most lines
  • size B (brush tip) for filling in large areas (size 1 also works)
  • size 03 (0.3mm) for the occasional fine detail.
Even with a pen that is relatively waterproof, giving the ink at least 10 minutes to dry before coloring it or resting your hand on it (as you tangle or color another area) is a good idea.

Color Marker Comparison

When picking color markers, some considerations to keep in mind are:
  • number of available colors
  • drying speed (affects how much blending or accidental smears I get)
  • available pen widths and shapes
  • price
  • ease of replacing individual markers
  • acid-free (better for art you want to last a long time)
  • how even and clear the color is
Of course some of these are more or less important to different people. I experimented with a few different types of markers at an art store (Copic markers) and at home (Sharpie permanent markers and Tombow Dual Brush Pens). Here are some notes about each:

Tombow Dual Brush Pens
  • Expensive (currently $125 on Amazon for 96-color set, which is $1.30 each)
  • Water-based (more likely to smear on completed artwork if it gets wet, but allows more color blending, including "indirect coloring")
  • Acid-free
  • Two tip sizes on each pen
  • Small variety of colors sold individually at some art stores; buying pens individually on Amazon is expensive if you include shipping costs
  • Really expensive (currently $239.99 on Amazon for 72-color set, which is $3.33 each)
  • Alcohol-based (less likely to smear on completed artwork, but dries fast enough that color blending is difficult)
  • Some versions have replaceable nibs (points) and replaceable ink cartridges
  • Provides a color chart that shows pen colors in the context of a complete color wheel, which I admit is pretty cool.
  • Acid-free
  • Different tip sizes and chisel tips are available
  • Inexpensive (Currently $59.99 on Amazon for set of 72 colors, which is only $0.83 each
  • Alcohol-based  (less likely to smear on completed artwork, but dries fast enough that color blending is difficult)
  • Not acid-free
  • Once tip size for each pen (but you can buy pens with different tip sizes)

Finding and Organizing Tangle Patterns

Here are some suggestions for finding and organizing tangle patterns.

Finding Tangle Patterns

Here are some ways to find new tangle patterns with links to useful resources.
My "Tangle patterns" board on Pinterest.

  • If you are someone who is new to tangling or that likes step-by-step instructions, consider purchasing one or more Zentangle books (I bought Joy of Zentangle) and (Time to Tangle with Color after looking through options at a local craft store).

  • Use Pinterest to search for tangle patterns and save ("pin") any patterns you like to a board. I created a "Tangle patterns" board that you look at or follow if you want an example. (Note that in order to access Pinterest you might need to create an account.)

  • Google "tangle patterns"

  • Look at official Zentangle patterns online (may not include patterns reserved for books or classes) or look for certified Zentangle teachers in your area.

  • Buy a coloring book with tangle designs in it. One of my favorite tangle patterns I use in backgrounds is adapted from the Creative Coloring Patterns of Nature coloring book I bought.

  • Look around you! I found that after tangling for awhile I started noticing both natural and man-made patterns around me more often.

Organizing Tangle Patterns

There are many different ways of saving and organizing tangle patterns. I think there are really three main considerations to take into account: how you want to access the patterns, how much help you need with recreating steps, and how important it is to you to be able to categorize and rearrange your tangle patterns.

Pattern Binder/Portfolio

If you like having a physical copy of your patterns rather than looking them up online, consider buying a 3-ring binder or portfolio with plastic sleeves that you can put tangle patterns into. I like using a portfolio that is loosely organized by pattern category so that I can flip through and find different patterns quickly. A portfolio gives you the flexibility to categorize and rearrange tangle patterns fairly easily.

To get a good start on a pattern portfolio I printed out tangle patterns that I found online that were organized into small squares, one pattern per square (I chose to print them out on 8 1/2 inch by 11 inch paper). I didn't want huge books full of patterns to haul around and didn't feel that I needed step-by-step instructions for most patterns, so this worked fine for me. The pages of patterns that I printed came somewhat pre-organized into categories. I also created pages with blank squares so I could add additional tangle patterns and variations to the appropriate category later.
My pattern portfolio. The page on the left contains patterns I drew on a page of blank squares. The page on the right was printed from Pinterest (examples of "scale" patterns).
 I write the name of the tangle pattern below the example if I know it, which helps me look up step-by-step instructions online later if I need them.

You can also buy 3-ring binder plastic inserts that have multiple slots on each page, often sold to store things such as recipe cards (two 4 inch by 6 inch cards per page) or baseball cards (nine baseball cards on each page). Here is an example of one of my tangle patterns copied onto a small blank card that you can buy that has spaces for tangle steps on one side and room for a tangle name, example, and designer on the other. These cards are the size of baseball cards (2 1/2 by 3 1/2 inches), so may be too small for some tanglers.
My "Knotwork" tangle pattern drawn on a blank zentangle card.
You can also create your own template for saving tangle patterns or download various options on Pinterest.

Online Organization

I created a Pinterest board called "Tangle Patterns" to help me save patterns I found online. If you want minimum bulk to carry around and like to have step-by-step instructions for each pattern, this can be a good option. If organizing patterns is really important to you, you could create different boards for different categories of tangles -- whatever categories you find helpful. It is easy on Pinterest to "pin" a pattern to more than one board if you think it belongs in both "grid" and "spiral" categories, for example.
My "Tangle Patterns" Pinterest Board

Other Options

For me personally, digging through piles of tangles on cards seems cumbersome and would drive me crazy. I remember reading about someone, though, that loved putting all of their cards into a box and randomly grabbing out a card each time they did a new section of their tangle!

Another option for organizing tangles is to punch a hole in them and put them on ring clips (or even a bracelet with each tangle laminated). I generally find flipping through patterns on a ring to be annoying (especially if you have a lot of patterns on the ring), but it can be useful. I did this with a set of tangle pattern cards aimed at kids (Yoga for Your Brain Kidz Cards) so that the kids had a set of relatively easy tangle patterns that they would be less likely to lose. Since there were only a relatively small number of cards, this worked fine.
I punched holes in the corner of each "Kidz Card" and put a ring through the holes.
If you like to grab a small selections of cards to keep with you (on a trip for example), having a small subset of your collection on a ring might be a good idea.

Friday, May 13, 2016

"Orange Castle" (Orange Circle Tangle)

Orange Circle Tangle ("Orange Castle") by Megan O'Madadhain
My Orange Circle Tangle (nicknamed "Orange Castle" is part of my "Rainbow Circle Tangle" series. For this series I started by tracing a circle and then used circles to define the regions.

The good:

I like the sense of motion I feel when I look at this. I like the castle if I don't look at it too closely.

Sunday, May 1, 2016

"Flowers from Jupiter" Red Circle Tangle

"Flowers from Jupiter" (Red Circle Tangle) by Megan O'Madadhain
My Red Circle Tangle (nicknamed "Flowers from Jupiter") is part of my "Rainbow Circle Tangle" series. For this series I started by tracing a circle and then used circles to define the regions.

The good:

I like the type of flowers at the top and how they look surrounded by a pink outline.
I like the floral pattern on the left.

I had fun doing Jupiter-like patterns on the right.
The large flower in the middle is similar to ones I have been drawing on white boards all across the country for decades, so it has nostalgic value.

Saturday, April 16, 2016

Background: Art and Me

"Artistic"

I have always enjoyed art and considered myself to be artistic. To me that just means that I have a desire to express myself through art, notice and reflect on patterns/shapes/colors around me, can do reasonably well at my first try at arts and crafts, and have a fighting chance at Pictionary. I will sometimes obsess about getting a particular art project "right." If I learn a good general technique I will remember it and apply it to many different situations.

In Every Direction


As a child I would make up something to do with few materials and no specific guides to follow (one must remember this was pre-internet) but often would lose interest as soon as I was presented with a related art "kit." I fluctuated between spending time on what I would consider "art," writing, creating floor plans and maps, creating weird systems (I once created essentially a dice game of people getting better/worse in a hospital), making things out of Legos, creating plays and musicals starring my toys, and hand stitching dresses for very small (3") dolls.

In school projects I would follow any explicit rules -- I couldn't stand getting in trouble -- but I stretched the limit of every assignment in a desperate need to express myself. Favorite clay piece that I remember is sort of a combo of a cat and a human face with it's tongue out. Still have it and still like it for some reason. I also carved a Buddha-like figure out of pumice stone that I still have. My mom used to work at the Oregon School of Arts and Crafts and was able to get a free drawing class for my brother and I -- but I think I was really too young to get much out of it.

Gaining Perspective

I learned pretty much everything I know about perspective and shading from an awesome art teacher in Jr. High (and artist) named Jan Rimerman. One of my favorite classes of all time. I'm not saying I'm great at perspective drawing (working on improving), but whenever I am trying to do it I am tapping into those memories. I remember an art project to create our own currency. We also got to do more with clay than I had in the past. I remember making two clay masks and an ambitious attempt at a woman standing on the top of a mountain with an orb over her head... but it broke in the kiln, unfortunately. I taught myself how to do the most basic of things on the sewing machine -- basically sewing a seam on non-stretchy fabric and sewing over fabric edges so they wouldn't unravel. I made a few very fancy period-inspired dresses for a few Barbie dolls that I bought -- I wasn't really interested in dolls by that point but it's a much better size to create dresses for. I was in an amazing class that was considered "Advanced Social Studies" in which we at one point got to design a country including maps, religion, culture and exports. Maps -- lots of maps. I sometimes had homework to copy a map of different places, but I made lots of extra ones and spent a lot of time on them. I loved to color inside each country with dark colored pencils and fade towards the middle.

I did not do a lot of art in high school that I remember, but being an editor on the school newspaper gave me some exposure to doing layouts in various applications. I remember doing a collage from magazine images my freshman year that I loved -- didn't look anything like anyone else's. I remember that I had an image of a triumphant tennis player (hands held high) being sucked into the middle of a black hole graphic. And ballerina legs on top of a satellite.

Drawing on Experience


In college I tried a few more crafts and doodled flowers on just about every white board. For awhile I made lots of cards, primarily for my boyfriend at the time -- but kind of got burned out on them because I never received any... and decided I didn't want the expectations in either direction. I created a way to do paper roses that I would give away to friends. I learned how to do a "stitch" but not a "purl," but stubbornly knitted a king-sized plaid blanket a few years later even though I am very slow at knitting (it helped that my future husband was several hours away by train for a few years). I learned how to create bead necklaces that had flower patterns in them. At some point I got interested in using Sculpey, and experimented a little bit with it.

I took a drawing class and two oil painting classes in college, which made me somewhat better at drawing in general (we only got to draw the same 6 plants for most of the term) and a little better at drawing people. I think my college art classes gave me a much richer appreciation and understanding of color and helped me learn to make very light sketches of things before I started doing details.

I created two paintings in college that I like. The largest (about 3'x3') is a painting of me climbing between rocks, inspired by a Spring Break trip to Arches National Park. It has many flaws but I did a great job of drawing the back of my left hand and the painting reminds me of a special trip. I used to have it up in a previous apartment, but I got tired of a relative telling me twice on every visit how much he hated it. My very favorite is a painting of a painting. First I did a real life painting in class of a woman on a chair with some background elements. Then I tilted that painting so the chair looked like it would fall over backwards and painted the woman and chair in a much freer style. In general I was painting parts of her and the chair and then wiping off a lot of the paint in the center of each. It almost felt like sculpting. There is an interesting tension between the colorful happiness of the woman and the fact that the chair feels like it is about to tip backwards.

I still don't consider myself to be very good at drawing, especially from real life. I can draw quick specs for something, but more detail than that is really rough. The people that I know that are really good at drawing are doing art all of the time and have notebooks filled with their art.

Art with the Masses


The first year after college I was an AmeriCorps volunteer based in a grade school. I was primarily working with ESL students in various ways, but as a big school-wide project I traced a large map of the world in black crayon that stretched across 3 pieces of tag board. I worked with almost every class that went to that school to add features to the map, using a style I used extensively in junior high school (each country or body of water is colored darkly on the borders and more lightly in the middle). Working on that project is one of the things I am most proud of. Not just because the map looked good and was a group effort, but because of the change it made in how the kids viewed themselves as descending from immigrants from all over the world. We let each kid put two pins in the map representing two places that some of their ancestors lived. I remember at first everyone only had "ancestors" from U.S. cities and kids were very self-conscious about having relatives from other countries. However, I challenged the kids to "go back in time as far as you can" to find out where some of their ancestors had come from. It became "cool" to be able to put pins in new areas. I remember a girl who came running up to me, so excited because she had an ancestor from Australia, and no one else had put any pins on that country yet. But I digress...

World Enough and Time


I have also gotten into the habit of doing marbling or stippling on many walls in my house. I no longer am willing to do them on rooms with very high ceilings, however!

The periods of doing any art at all have gotten further and further apart as I have had less free time. When my husband and I were dating I made several small dragons out of Sculpey -- the most notable of which was playing a french-horn. The french horn only took 2 tries and took about 8 hours, so I got off pretty easy... Since college I have continued to do some sort of art for a few months and then lose interest. For example, I have a baby scrapbook for my first son... and scrapbook supplies that maybe someday will get used to create scrapbooks for my other three kids, but otherwise just serve as a source of stress <sigh>. At some point in college or afterwards I did several black construction paper and tissue paper projects that look vaguely like stained glass. I occasionally come back to doing that kind of art. I think I am less self-critical doing it because I never see better examples. The only time I see that kind of art is in grade schools, and I'm sure they don't let kids have x-acto blades. On the negative side I am not particularly dexterous (just stubborn), so I have to do a lot of patching of "oopsies" and have to make tons of course corrections. I remember I did a series of 3 scenes from Cinderella and a somewhat abstract one for my mom that sort of looked like a woman's hand playing the guitar.

Exploring Artists


For the last few years I have volunteered at my kids' school with the "Explore Art" program. Basically, a parent comes to each class about once a month and teaches a little bit about a particular artist and then helps the kids to an art project that is somehow inspired by some of that artists' work. The lessons for each grade are age-appropriate (attention span and typical dexterity for that age) and are designed to build art vocabulary and techniques from previous years. Overall, it is very rewarding, but also sometimes makes me sad when I see someone's creativity get squashed because of a volunteer that cares way too much about the kids strictly following the rules or get cramped by time constraints. By about 4th grade many kids get very good at drawing one particular thing (could be anything: flowers, Minecraft characters, superheroes, unicorns, etc.) that they feel confident about but are very resistant to trying to draw other things or using different techniques. I try to find a reasonable balance between following the spirit of the art lesson, letting them do art they are comfortable with, and stretching them to try to try something that maybe they haven't tried before. I remember a lesson on stippling using paints during which a girl accidentally got so much water on her brush that the dots in part of her art blended together. She was so upset she burst into tears. I remember telling her in all honesty that that was my favorite part of her drawing and she should remember how she did it in case she wanted to do it again. I don't like being the main parent teaching the art lesson (I prefer teaching 1-4 students than 25) but I really like helping. One of the parent volunteers that I admired liked to say something along the lines of "you kids are artists... and whatever art you do is peeerfeeect." I am not generally a fan of praising all kids' efforts as "perfect." However, it really set the tone in her classes and I could tell that the kids were a little more flexible about trying new things and less panicked when they got a little lost or made a "mistake."


Art With My Kids


For most of my kids' art projects I am just offering practical advice and providing resources to help them do whatever project they are into at the moment. I have helped my kids modify their Minecraft-inspired cardboard armor so that it can easily go on and off of their stuffed animals, make Perler Bead projects, Rainbow Loom projects, and provided lots of paper for origami and paper airplanes.  One of my sons has made some really impressive... gliders? that are made out of paper and thin cardboard strips and kind of look like a huge bird or pterosaur. I don't really like doing Perler Bead and Rainbow Loom projects -- too much planning before you get started, and difficult to make changes.

I have also made (low-quality) outfits for my kids' stuffed animals on request -- but only if they help. I am hoping to be able to make them a pattern that they can use for future clothes. I really wish they had straightforward stuffed teddy bears or something instead of all of these lounging cats, etc. It would also be nice if they wanted shirts and shorts or something instead of superhero costumes, which they want to fit more snugly. I always do very simple costumes because 1) I am not great at sewing and 2) Each stuffed animal so far has required starting from scratch as far as clothing patterns and 3) I want the costumes to be things that they will think are possible for them to do by themselves eventually.

*** THIS JUST IN ***
 I am just now reminded of a trick someone told me for creating your own corset (wear an old t-shirt, create a corset over it using duct tape that can then serve as a pattern. Oooh... gotta teach my kids that trick for animal superhero costumes. They might accept the duct-taped version as the costume.  Project!
***

A Tangled Web


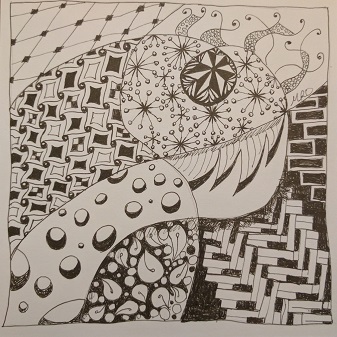
I knew this year that I really needed to find more things that I enjoyed doing in my free time. I finally felt like I had enough of that to work with now that my youngest is in kindergarten. Also, I knew that I needed to have surgery and would need to lay low for a few months as I recovered. I like doing art, but I don't currently have a lot of space or time to do it. I saw a book on creating Zentangles, and immediately recognized that it was perfect for me right now.

Short guide to creating a Zentangle: divide a small piece of paper (recommended 3" on a side with rounded corners) into a few random sections with pencil and fill each section with different patterns using a black pen. Some shading with pen or pencil allowed.

This is perfect for me because 1) doesn't take up much space 2) needn't take up much time and 3) emphasis on doing things in pen means "there are no mistakes" and I don't run around in circles trying to re-do areas over and over to get the art to be "perfect." You do a tangle, mentally log what went well and what didn't, and do another one. I am practically physically incapable of 100% following directions when it comes to art (and uncomfortable breaking rules in just about every other situation). I still have not done art that follows all of the Zentangle guidelines completely, but may challenge myself to do so at least once. I use 4" x 4" or 6" x 6" paper squares (supposed to use 3"x3"), lightly sketch difficult geometric patterns in a section before switching to pen (supposed to do all patterns in pen), and use a lot of color (supposed to be only one color of pen and minor shading with pencil). A lot of artists are doing similar things and consider their work to be "tangles," so I consider my recent work to be "tangles" or "tangle -inspired."

It should come as no surprise that there are thousands of examples of different artists' tangle art and thousands of tangle patterns on Pinterst (which now includes my tangle art board). There are hundreds of videos on YouTube of people doing tangles. There are dozens of books you can buy to learn different patterns or books that provide tangle-inspired artwork to color. Many zentangles or tangles look like -- a piece of paper divided into sections with different designs, and don't interest me at all. Some tangle art fills me with excitement when I see it (usually ones that aren't following all of the Zentangle "rules"). I am happy to create different tangles and try different things, but I aspire to creating some tangles that fill others with the same excitement I have felt seeing others' work.

Path of Least Resistance

I know I could improve my art skills in many different directions if I focused my efforts.  I wish I could say that I was really good at drawing the world accurately and chose to do art that is somewhat impressionistic, abstract, or quirky just because it helped me convey my viewpoint. However, the truth is I am rarely able to draw anything like what I see in my mind and have to keep adjusting what I would like to draw to what I can draw reasonably well. I am also hampered by the fact that I consider myself to have less than stellar manual dexterity. Some who see some of my art might argue with that assessment, but they are mistaking "stubbornness" (and many course corrections) for "talent." I will try to think of it as "determination" rather than "occasionally exhibiting OCD-like symptoms." I cannot draw a successful straight line or curve if it is more than about two inches (as far as I can move my pen tip while keeping the heel of my pen on the table). Larger body motions like doing larger charcoal drawings feel much more natural. I know that there are many things I could do much more successfully as digital art, but I just can't create new things without having a tactile experience with the medium. Perhaps at some point I will take previously created designs and do purely digital versions later. I have had to make some edits to my art to make it look good when I reproduce the design on t-shirts, etc. so I am somewhat moving in that direction. I would love to be able to sketch out an art design and have a bunch of artists try to draw what I describe. Almost makes me want to create a children's book just to get to do that.

Personal Enterprise

My sister-in-law saw some of my tangle art and remarked that she would much rather have that on a shirt than most things she sees. After having spent a fruitless search for acceptable women's t-shirts a few weeks previously (everything ran to flowers, animals, or glitter), I was inclined to agree, but hadn't though about anyone else feeling the same way. I am often a very under-served consumer -- if I can't find something that is really close to what I want I often just "punt" (buy nothing). I needed t-shirts anyway, so I created a Cafe Press store (Cafe Press: "Megan's Tangle Art") in case anyone I know (expected pool of potential customers) wants to use my designs on t-shirts, mugs, etc.  After reading up a bit on their somewhat shady seller compensation practices I may move to another site, or try another one on Zazzle or Amazon in addition to the first. I have certainly had to "get my geek on" to get even those fledgling stores and this blog up, but obviously there is a lot of room for improvement. I also have spent way too many hours learning about the most basic of image manipulation using free GIMP software. Dangerous time sink, but necessary to get artwork up online in a form that would look good on a light or dark t-shirt.
Shirt using v1 of my "Purple Circuit" design

Maybe that now that I've been doing tangles for a few months I will lose interest -- not unprecedented for the fickle artist that I am. Especially true since I've spent the last week wrestling with GIMP, Photoshop (briefly) and Cafe Press' horrible UI for shopkeepers (I may have to do a few more UI Behaving Badly blog posts). Writing about the art I am doing makes me more self-conscious about my process and makes it harder to be spontaneous. Learning about what things will make my art look cleaner when digitized also has that effect to some degree. On the plus side, I have a good head start since I have already done about 14 tangle-inspired drawings.

The Good, The Bad, and the ...What IS That?


I would like to post some of my art work here so that people can link to the pictures that they like and read the commentaries if they wish. Also, I don't want to pester people with art announcements -- I'd rather people had the option to just check my website when they are in the mood. I'd be interested to know what things people respond to, or if certain pieces remind them of something. Some of art is a little... odd. I feel a little intimidated as a beginner when I look at other people's tangle art on Pinterest or YouTube -- I'm glad I didn't do that until creating a dozen tangles myself. I can't help wanting to focus my blog on art that went well... but I will also post some art that didn't go well. It can help me mentally process what I have learned and also may help other beginners. Many of the expert tanglers out there do their practiced tangle patterns effortlessly, but never say anything about how they are thinking through what they do and when (if ever) they have sparks of inspiration or make "mistakes" that make them change their design.

When I am creating a successful tangle I feel like I am navigating inside of it like a dream landscape and experiencing it in almost a kinetic way. Maybe someday I will be able to explain that better. I may start by trying to draw a specific pattern, but when I try to draw it, it transforms into something else. I like art that has motion and takes me on a journey.